Get started tutorial
Your first iOS App with Chat21 SDK
Introduction
With this tutorial you will learn how to create a fully functional chat as a Single View Application
The full code of this tutorial is available on GitHub:
Prerequisites
Before you begin, you first need to set up your environment:
- Xcode 9.0 or later
- An Xcode project targeting iOS 9 or above
- The bundle identifier of your app
- Firebase project. Create one free on https://firebase.google.com
- Firebase functions. Install Chat21 cloud functions on your just created Firebase project. This is the “backend” of the chat. Installation instructions are available here
Configure authentication
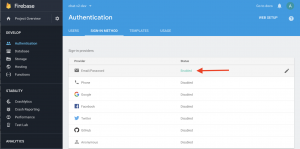
Enable email signin in Firebase console
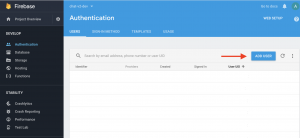
Create a user to test chat functions
Choose email and a password
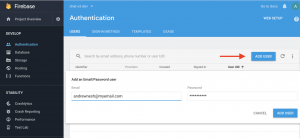
Add the user with “ADD USER” button.
Create the Xcode project
This first tutorial will focus on the creation of a simple single view application. In the next (upcoming) tutorial we will approach the creation of a more realistic multi tab application (similar to Whatsapp).
First open Xcode, select File > New > Project and choose Single View App
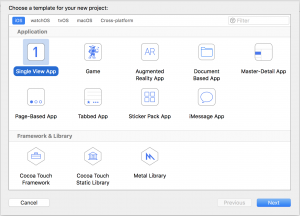
Insert the project info using MyChat as project name and insert your team
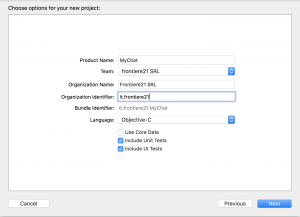
Create the Firebase iOS App
Switch on project on Firebase, go to the Firebase Console > Project Overview and add a iOS App to your project by clicking on “Add iOS App” and follow the setup steps.
When prompted, enter your app’s bundle ID. It’s important to enter the bundle ID your app is using, this can only be set when you add an app to your Firebase project.
At the end, you’ll download a GoogleService-Info.plist file. You can download this file again at any time.
Now add this file to your Xcode project root using the Add Files utility in Xcode (from the File menu, click Add Files). Make sure the file is included in your app’s build target.
Add Firebase libs to the project
Now go back to your Xcode project and add firebase libraries to your project.
We prefer CocoaPods to add Firebase libraries. If you use CocoaPods simply create a file named “Podfile” in the project’s root folder with the following content:
platform :ios, '10.0'

target 'MyChat' do

pod 'NYTPhotoViewer'
pod 'Firebase/Core'
pod 'Firebase/Database'
pod 'Firebase/Auth'
pod 'Firebase/Messaging'
pod 'Firebase/Storage'

end
Close Xcode and run:
> pod install
From now on open the project using MyChat.xcworkspace file.
NOTE: the complete guide to add Firebase libs to you project is available here:
https://firebase.google.com/docs/ios/setup
Install Chat21 libraries
Download the Chat21 libraries directly as zip archive from GitHub here:
https://github.com/chat21/chat21-ios-sdk
Add the two folders:
- Chat21Core
- Chat21UI
to your Xcode project using the Add Files utility in Xcode (from the File menu, click Add Files). Make sure the folders are included in your app’s build target.
NOTE: we are currently developing a more useful pod distribution files.
Get start with the UI
First remove the two files FirstViewController.{h,m} because we’ll use our chat’s conversations’s history as root View Controller.
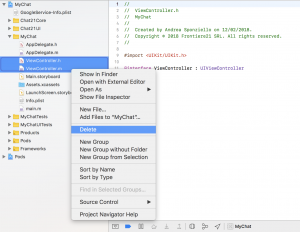
Open AppDelegate.m adding the following import directives:
#import "AppDelegate.h"
#import "ChatManager.h"
#import "ChatUIManager.h"
#import "ChatUser.h"
#import "ChatAuth.h"
@import Firebase;
Now configure Firebase and Chat frameworks. Edit the didFinishLaunchingWithOptions method, adding the following code:
[FIRApp configure];
[ChatManager configure];
return YES;
Using the previously created user’s email and password, add the highlighted code to the didFinishLaunchingWithOptions method:
[FIRApp configure];
[ChatManager configure];

NSString *email = @"YOUR-EMAIL";
NSString *password = @"YOUR-PASSWORD";
[ChatAuth authWithEmail:email password:password completion:^(ChatUser *user, NSError *error) {
  if (error) {
    NSLog(@"Authentication error. %@", error);
  }
  else {
    ChatManager *chatm = [ChatManager getInstance];
    user.firstname = @"John";
    user.lastname = @"Nash";
    [chatm startWithUser:user];
    UINavigationController *conversationsVC = [[ChatUIManager getInstance] getConversationsViewController];
    self.window.rootViewController = conversationsVC;
    [[ChatManager getInstance] createContactFor:user withCompletionBlock:nil];
  }
}];
return YES;
Now launch the project.
If everything is correct you will see the conversations’ history with no conversations.

As you can see, in the authWithEmail completion block we use the createContactFor method to create a contact on the remote backend for the currently signed user. In this way every user will add his metadata to contacts as soon as he sign in. The button on the upper right corner open the contacts list.

You will see yourself listed. If you want you can chat with yourself but it’s better to create another user and sign in on a chat installed on another device (or simulator instance).
Happy chatting 🙂
The full code of this tutorial is available on GitHub:
